Although this year’s iOS 17 release isn’t chock-full of some of the big “tentpole” features we’ve seen in recent years, like customizable lock screens and home screen widgets, there are some fun and exciting enhancements that will change the way you use your iPhone.
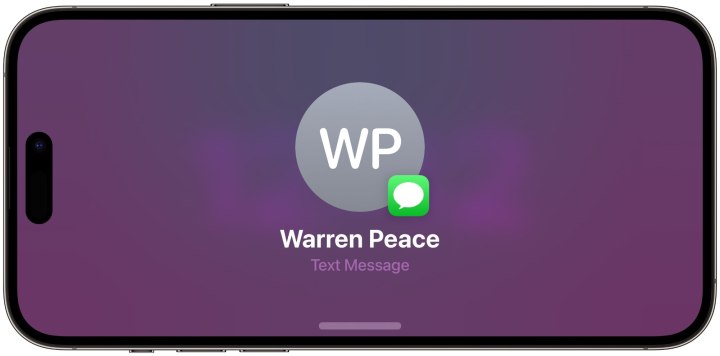
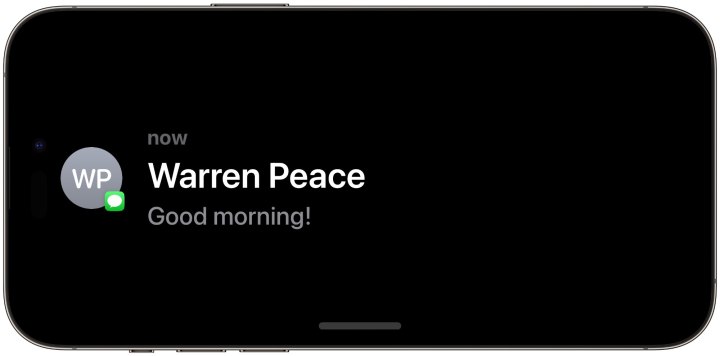
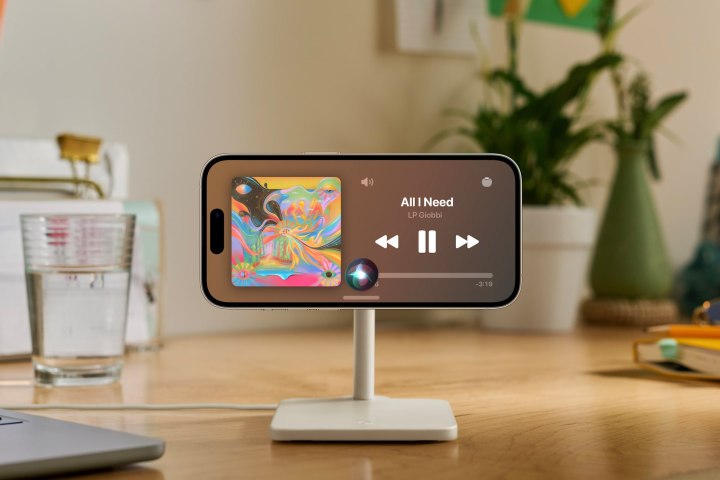
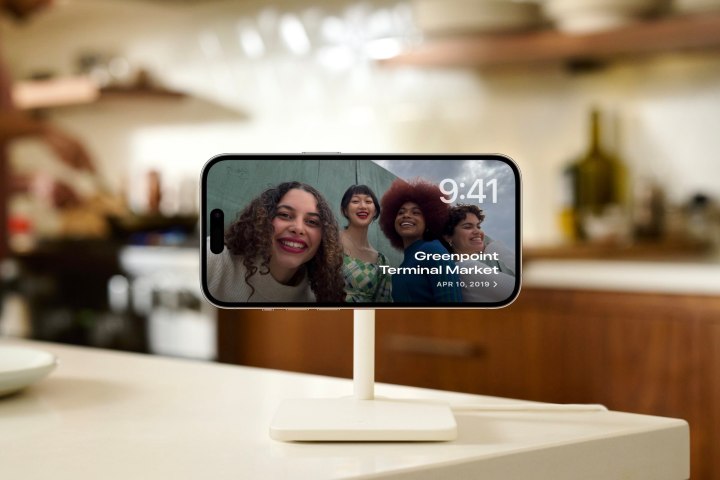
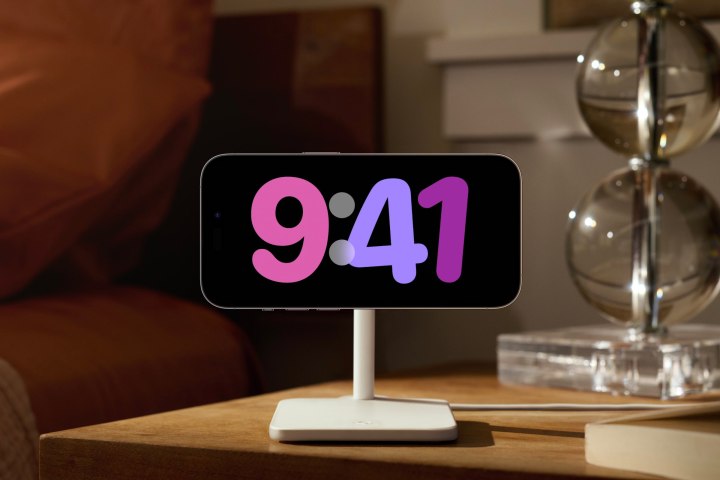
Perhaps the coolest and most significant of these is the new StandBy mode that will let you turn your iPhone into a smart display while it’s sitting on a charging stand. StandBy provides a new lock screen experience that lets you quickly see information at a glance, even from across the room — showing photos, clocks, weather, and other info from a variety of customizable widgets. Incoming notifications, responses from Siri, and music playback controls also use StandBy to appear in an easily readable full-screen view.
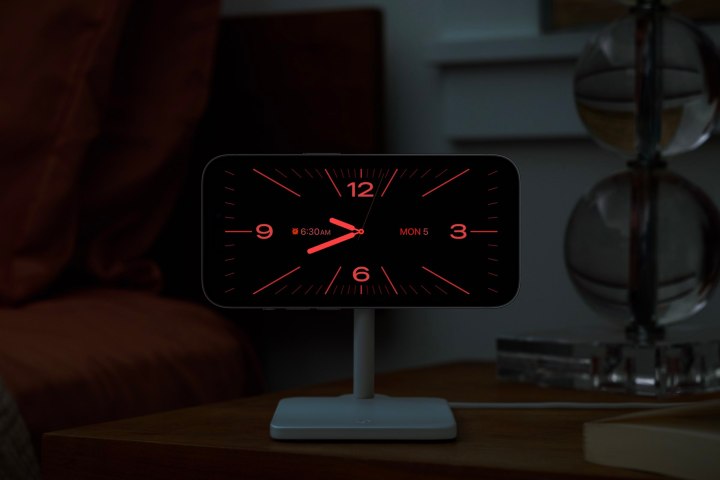
StandBy also takes full advantage of the always-on display on the iPhone 14 Pro and iPhone 14 Pro Max, and can even dim to a comfortable red tone at night, making it a great bedside table replacement for an alarm clock or standalone smart display like an Echo Show 5.
Like many of the features that Apple adds to the iPhone, StandBy works out of the box on any iPhone running iOS 17 without the need to tweak too many settings. However, there are still a few things you’ll want to know to get the most out of Apple’s new StandBy feature.

How to turn on StandBy on your iPhone
StandBy will be enabled by default as soon as you update to iOS 17, but you can confirm this with a quick trip into the Settings app, where the toggle switch for it can be found under StandBy.
If you find that StandBy is more annoying than helpful, you can also turn it off from here, but Apple has done an excellent job of designing it to stay out of your way.
There are also a few conditions your iPhone will need to meet to activate it. Specifically, your iPhone must be in landscape orientation, locked, charging, and not lying flat on its back.
- The StandBy mode will not engage unless your iPhone is at the lock screen, even if it’s sitting at the home screen. Otherwise, StandBy mode could get in the way of whatever you’re doing.
- The iPhone also must be connected to charging power in some way. Although a MagSafe charging stand is ideal since it will also hold your iPhone at a proper viewing angle, any power source will work, including standard Qi chargers or even a wired Lightning cable, as long as you have a way of propping the iPhone up.
- That last part is the final trick. Since StandBy is designed to work as a smart display, it won’t activate after laying your iPhone down horizontally — even if you’re using a MagSafe charger. Your iPhone needs to be at an angle of at least 30 degrees from horizontal for StandBy mode to engage.
Unfortunately, even though StandBy will work on any iPhone that can be updated to iOS 17 — all the way back to the 2018 iPhone XS/XS Max and iPhone XR — the screen will only remain on if you’re using an iPhone with an always-on display. For now, that’s the iPhone 14 Pro and iPhone 14 Pro Max. With other iPhone models, you’ll only get 30 seconds before it shuts off, likely to reduce the risk of screen burn-in.
Even with an always-on display, the screen will turn off at night or any other time when your iPhone thinks it doesn’t need to be on, such as when it knows from your Apple Watch that you’re at the other end of your house. The StandBy screen will come back on when movement is detected or when you tap your iPhone or call out to it with a hands-free Siri request.
How to edit StandBy settings
While StandBy just works for the most part, there are a few settings you can tweak to adjust it to your liking. This includes how notifications are handled while in StandBy mode, whether to use the always-on display on supported iPhone models, and how StandBy works at night.
Step 1: Open the Settings app on your iPhone.
Step 2: Scroll down and select StandBy.
Step 3: Ensure StandBy is enabled. The other settings won’t appear otherwise.
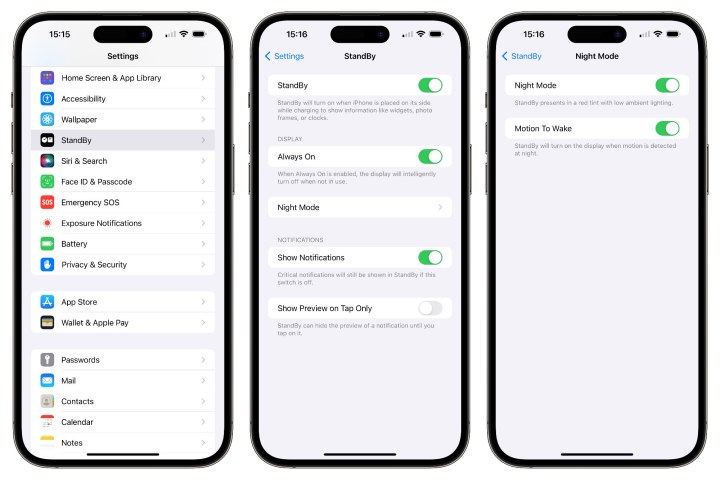
Step 4: If you’re using an iPhone 14 Pro, iPhone 14 Pro Max, or newer model with an always-on display, you’ll see an Always On switch you can toggle to disable it.
When this is off, the screen will automatically turn off after 30 seconds in StandBy mode. It will come back on if you tap it or if the iPhone’s accelerometer detects vibration, such as a nudge to the table it’s on or even nearby footsteps in some cases.
Step 5: Select Night Mode to adjust how StandBy works in a darker room or at night.
When the Night Mode setting is enabled, the StandBy screen will adopt a dimmed red tint when the ambient lighting around your iPhone is low to keep it from searing your eyeballs. Despite the name, Night Mode will engage at any time of the day in lowlight conditions.
Step 6: You can also toggle off Motion To Wake from the Night Mode settings if you want your screen to remain dark at night, even when motion is detected.
Step 7: Select StandBy in the top-left corner to return to the main StandBy settings screen.
Step 8: Toggle off Show Notifications if you prefer to silence notifications in StandBy mode.
Even when this is on, notifications in StandBy mode work the same as they do otherwise, meaning you’ll only see them on your iPhone if they’re set to appear on your lock screen, and they won’t be shown if they’re delivered to your Apple Watch instead.
Further, as the text on this screen notes, this won’t block critical notifications, which can burst through all do not disturb modes and always play a sound even when your iPhone is otherwise muted. That’s a good thing since these alerts are reserved for only the most serious situations, such as smoke and security alarms and severe weather emergencies.
Step 9: If you’ve opted to show notifications, you can toggle on the Show Preview on Tap Only setting for additional privacy.
When this option is enabled, you’ll need to tap your screen to see the details of all incoming notifications in StandBy mode. When this setting is off, StandBy will use your main notification settings to determine when previews should be shown. For example, if you normally only show previews of incoming messages when your iPhone is unlocked, they won’t be displayed in StandBy mode unless you’re looking at your iPhone so it can authenticate you with Face ID.
How to switch between StandBy screens
In iOS 17, Apple has provided three StandBy screen categories that you can customize depending on the information you want to view. You can switch between these by swiping to the left or right while StandBy is active.
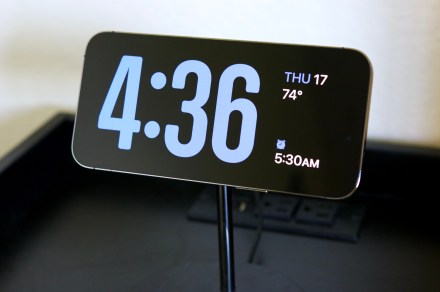
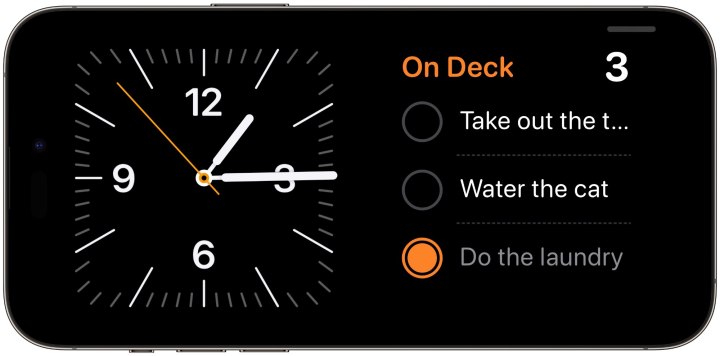
The first screen provides a two-pane widget view. By default, that’s set up with a clock on one side and a calendar on the other, but you can customize this with a variety of other widgets and swipe up and down to cycle through them.
Swiping right to left will take you to a second StandBy screen that lets you turn your iPhone into a digital picture frame, automatically cycling through a selection of images from your photo library. You can configure multiple photo collections here and swipe up and down to choose between them.
The final StandBy screen provides a selection of predefined clocks, similar in concept to Apple Watch faces. However, there aren’t nearly as many to choose from, and there are no widgets or complications here; customization is limited to changing the color palettes.
How to add and remove StandBy widgets
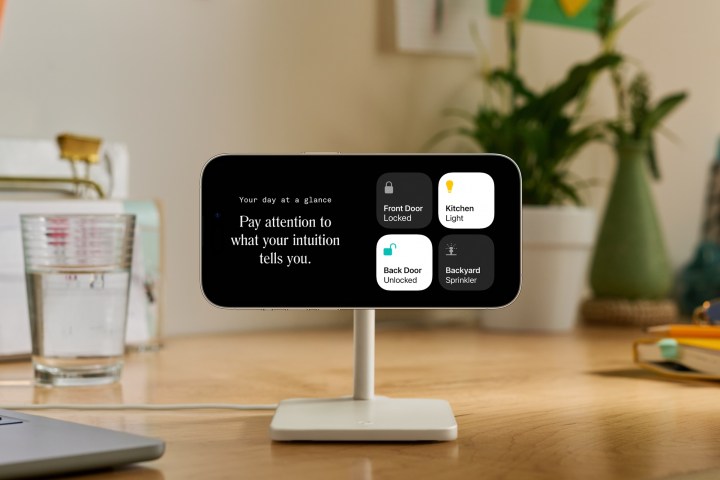
While it may not look like much more than a clock at first glance, the left-most StandBy screen is the most versatile of the bunch since you can customize it with a range of widgets, from clocks and weather to home controls, photos, and reminders. For now, the list is limited to Apple’s first-party apps, but many third-party developers are already working on their own StandBy widgets, so expect that to change once iOS 17 is released.
StandBy also supports the new interactive widgets in iOS 17. You can check off items in the Reminders widget, toggle home devices off from the Home widget, or play your favorite playlists from the Music widget. Much like the iPhone home screen, you can have a stack of multiple widgets and swipe up and down to switch between them manually or use the Smart Rotate feature to let your iPhone pick which ones should be shown based on the time of day and other conditions.
Here’s how to customize your StandBy widgets:
Step 1: Ensure your iPhone is in StandBy mode and you’re looking at the widget screen. If you see a full-screen photo view or clock instead, swipe left to right once or twice until the two-pane widget screen appears.
Step 2: Press and hold on the side of the screen where you want to add a new widget to open the widget editing view.

Step 3: Swipe up or down to view the widgets already in the stack.
Step 4: To remove a widget from the stack, select the minus button in the top-left corner of the widget and confirm its removal by choosing Remove from the prompt that pops up.
Step 5: To add a widget, select the plus button in the very top-left corner of the screen. From here, you can see a list of suggested widgets on the right of your screen or scroll through a list of apps with supported widgets on the left to find one you’d like to add. You can also select the Search Widgets field at the top to bring up a keyboard to look for a specific app or widget.
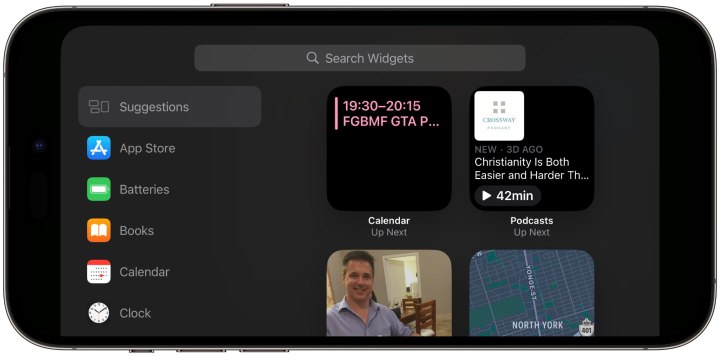
Step 6: Select a suggested widget or app to see a preview. Some widgets like Calendar and Clock offer multiple styles, in which case you can swipe left or right to see other options.
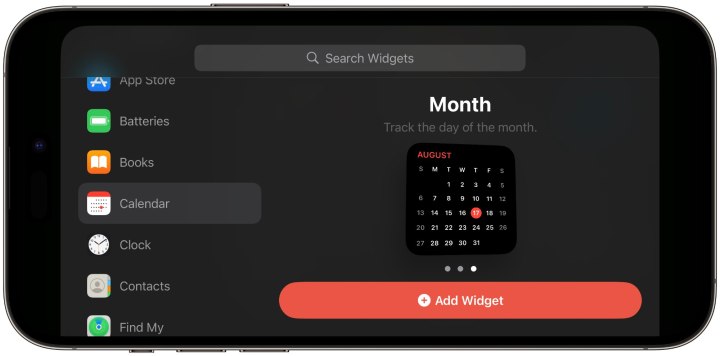
Step 7: Once you’ve found a widget you like, select the Add Widget button to add it to the stack.
Step 8: You can also select Smart Rotate on the right-hand side to choose whether you want widgets to be selected automatically at different times throughout the day or enable Widget Suggestions to have additional widgets automatically show up based on what your iPhone thinks you might use.
Step 9: When finished customizing your widget stack, select Done in the top-right corner to return to the StandBy screen. Repeat the steps above to customize the otherwise side of the widget screen.
How to customize your StandBy photo display
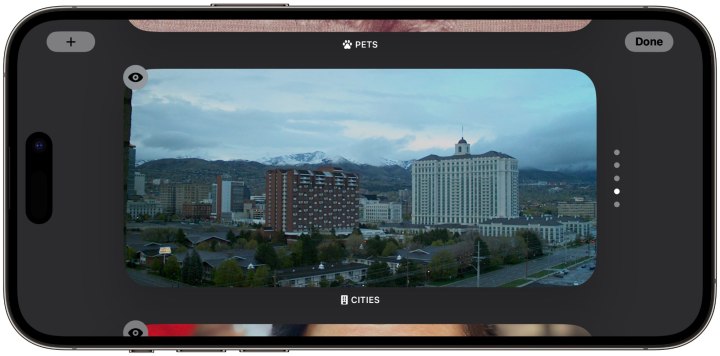
The second, or middle, StandBy screen is designed to show you a selection of pictures from your photo library. By default, you get five views: Featured, Nature, Pets, Cities, and People. You can swipe up and down to switch between these, hide any you don’t want to see, or add custom albums. Here’s how.
Step 1: Ensure your iPhone is in StandBy mode and you’re looking at the photos screen. If you see widgets or a full-screen clock instead, swipe left or right until the photos screen appears.

Step 2: Press and hold anywhere on the screen to enter editing mode.
Step 3: Swipe up or down to select a photo collection.
Step 4: To hide one of the preset collections, select the eye button in the top-left corner. Choose it again to unhide the collection.
Step 5: To add a custom album from your photos library, select the plus button in the top-left corner of the screen and choose the album you would like to add.
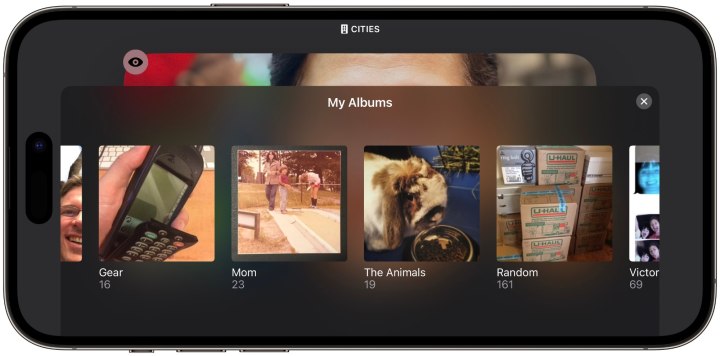
Step 6: To remove a custom album you’ve added, select the minus button in the top-left corner of the photo.
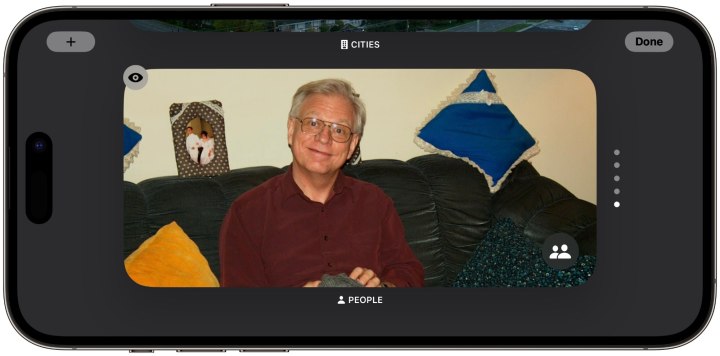
Step 7: You can also choose who appears in your People album by selecting the silhouette button in the bottom-right corner while in the editing view. This will bring up a list of all the faces from your photo library. Choose those you’d like to include in the collection; a blue checkmark will appear on the faces you’ve selected for inclusion.
Step 8: When finished, select Done in the top-right corner to return to the main photo screen.
How to customize the StandBy clock screens
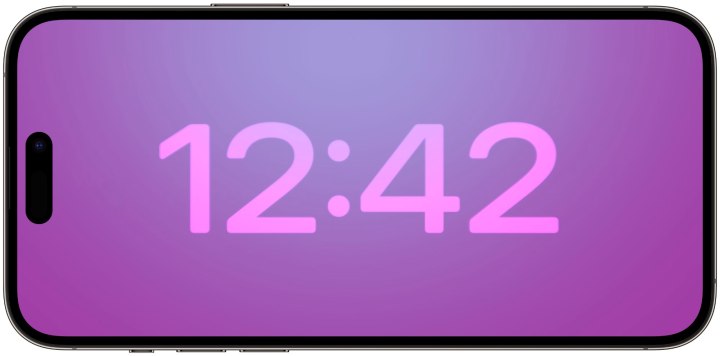
The third set of StandBy screens provides a fixed selection of five clock views: Digital, Analog, World, Solar, and Float. Each of these displays the time in a unique way, while some also show the date, temperature, and time of your next alarm.
Sadly, these aren’t very customizable, but you can change the colors for some, or at least the color accents. Here’s how.
Step 1: With your iPhone in StandBy, select the clocks screen by swiping right to left once or twice until it appears.
Step 2: Press and hold anywhere on the screen to enter editing mode.
Step 3: Swipe up or down to browse through the clock screens to find the one you want to customize.
Step 4: Select the white circular button in the bottom-right corner of the clock for which you want to change the colors.
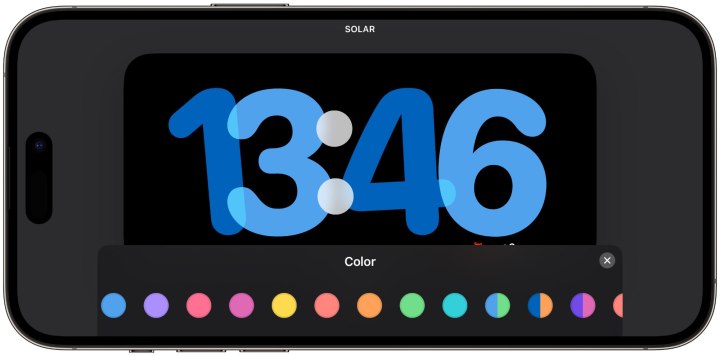
Step 5: Choose from the available color options to see a preview of what it looks like.
Step 6: When you find one you like, select the X button to close the color picker, and then choose Done in the top-right corner to return to the clock screen.
Editors’ Recommendations
- 3 reasons why I can’t leave my iPhone for an Android phone
- What I love (and hate) about my iPhone 14 Pro after one year
- The Dynamic Island was the biggest iPhone mistake in years
- How to make a Contact Poster — one of iOS 17’s coolest features
- How to check your IMEI number on any iPhone or Android phone


